Senin, 11 Oktober 2010

Generasi komputer

5 Generasi Komputer Dalam Sejarah
Komputer adalah alat yang dipakai untuk mengolah data menurut prosedur yang telah dirumuskan. Kata computer semula dipergunakan untuk menggambarkan orang yang perkerjaannya melakukan perhitungan aritmatika, dengan atau tanpa alat bantu, tetapi arti kata ini kemudian dipindahkan kepada mesin itu sendiri. Asal mulanya, pengolahan informasi hampir eksklusif berhubungan dengan masalah aritmatika, tetapi komputer modern dipakai untuk banyak tugas yang tidak berhubungan dengan matematika. Secara luas, Komputer dapat didefinisikan sebagai suatu peralatan elektronik yang terdiri dari beberapa komponen, yang dapat bekerja sama antara komponen satu dengan yang lain untuk menghasilkan suatu informasi berdasarkan program dan data yang ada. Adapun komponen komputer adalah meliputi: Layar Monitor, CPU, Keyboard, Mouse dan Printer (sbg pelengkap). Tanpa printer komputer tetap dapat melakukan tugasnya sebagai pengolah data, namun sebatas terlihat dilayar monitor belum dalam bentuk print out (kertas).
Dalam definisi seperti itu terdapat alat seperti slide rule, jenis kalkulator mekanik mulai dari abakus dan seterusnya, sampai semua komputer elektronik yang kontemporer. Istilah lebih baik yang cocok untuk arti luas seperti “komputer” adalah “yang memproses informasi” atau “sistem pengolah informasi.”
Saat ini, komputer sudah semakin canggih. Tetapi, sebelumnya komputer tidak sekecil, secanggih, sekeren dan seringan sekarang. Dalam sejarah komputer, ada 5 generasi dalam sejarah komputer.
1. Generasi Pertama (1944-1959)
5 Generasi Komputer Dalam Sejarah
Tabung hampa udara sebagai penguat sinyal, merupakan ciri khas komputer generasi pertama. Pada awalnya, tabung hampa udara (vacum-tube) digunakan sebagai komponen penguat sinyal. Bahan bakunya terdiri dari kaca, sehingga banyak memiliki kelemahan, seperti: mudah pecah, dan mudah menyalurkan panas. Panas ini perlu dinetralisir oleh komponen lain yang berfungsi sebagai pendingin
Dan dengan adanya komponen tambahan, akhirnya komputer yang ada menjadi besar, berat dan mahal. Pada tahun 1946, komputer elektronik didunia yang pertama yakni ENIAC sesai dibuat. Pada komputer tersebut terdapat 18.800 tabung hampa udara dan berbobot 30 ton. begitu besar ukurannya, sampai-sampai memerlukan suatu ruangan kelas tersendiri.
Pada gambar nampak komputer ENIAC, yang merupakan komputer elektronik pertama didunia yang mempunyai bobot seberat 30 ton, panjang 30 M dan tinggi 2.4 M dan membutuhkan daya listrik 174 kilowatts 2. Generasi Kedua (1960-1964)
5 Generasi Komputer Dalam Sejarah
Transistor merupakan ciri khas komputer generasi kedua. Bahan bakunya terdiri atas tiga lapis, yaitu: “basic”, “collector” dan “emmiter”. Transistor merupakan singkatan dari Transfer Resistor, yang berarti dengan mempengaruhi daya tahan antara dua dari tiga lapisan, maka daya (resistor) yang ada pada lapisan berikutnya dapat pula dipengaruhi.
Dengan demikian, fungsi transistor adalah sebagai penguat sinyal. Sebagai komponen padat, tansistor mempunyai banyak keunggulan seperti misalnya: tidak mudah pecah, tidak menyalurkan panas. dan dengan demikian, komputer yang ada menjadi lebih kecil dan lebih murah
Pada tahun 1960-an, IBM memperkenalkan komputer komersial yang memanfaatkan transistor dan digunakan secara luas mulai beredar dipasaran. Komputer IBM- 7090 buatan Amerika Serikat merupakan salah satu komputer komersial yang memanfaatkan transistor.
Komputer ini dirancang untuk menyelesaikan segala macam pekerjaan baik yang bersifat ilmiah ataupun komersial. Karena kecepatan dan kemampuan yang dimilikinya, menyebabkan IBM 7090 menjadi sangat popular. Komputer generasi kedua lainnya adalah: IBM Serie 1400, NCR Serie 304, MARK IV dan Honeywell Model 800.

3. Generasi Ketiga (1964-1975)
5 Generasi Komputer Dalam Sejarah
Konsep semakin kecil dan semakin murah dari transistor, akhirnya memacu orang untuk terus melakukan pelbagai penelitian. Ribuan transistor akhirnya berhasil digabung dalam satu bentuk yang sangat kecil. Secuil silicium yag mempunyai ukuran beberapa milimeter berhasil diciptakan, dan inilah yang disebut sebagai Integrated Circuit atau IC-Chip yang merupakan ciri khas komputer generasi ketiga.
Cincin magnetic tersebut dapat di-magnetisasi secara satu arah ataupun berlawanan, dan akhirnya men-sinyalkan kondisi “ON” ataupun “OFF” yang kemudian diterjemahkan menjadi konsep 0 dan 1 dalam system bilangan biner yang sangat dibutuhkan oleh komputer. Pada setiap bidang memory terdapat 924 cincin magnetic yang masing-masing mewakili satu bit informasi. Jutaan bit informasi saat ini berada didalam satu chip tunggal dengan bentuk yang sangat kecil.
Komputer yang digunakan untuk otomatisasi pertama dikenalkan pada tahun 1968 oleh PDC 808, yang memiliki 4 KB (kilo-Byte) memory dan 8 bit untuk core memory

4. Generasi Keempat (1975-Sekarang)
5 Generasi Komputer Dalam Sejarah
Microprocessor merupakan chiri khas komputer generasi ke-empat yang merupakan pemadatan ribuan IC kedalam sebuah Chip. Karena bentuk yang semakin kecil dan kemampuan yang semakin meningkat dan harga yang ditawarkan juga semakin murah. Microprocessor merupakan awal kelahiran komputer personal. Pada tahun 1971, Intel Corp kemudian mengembangkan microprocessor pertama serie 4004.
Contoh generasi ini adalah Apple I Computer yang dikembangkan oleh Steve Wozniak dan Steve Jobs dengan cara memasukkan microprocessor pada circuit board komputer. Disamping itu, kemudian muncul TRS Model 80 dengan processor jenis Motorola 68000 dan Zilog Z-80 menggunakan 64Kb RAM standard.
Komputer Apple II-e yang menggunakan processor jenis 6502R serta Ram sebesar 64 Kb, juga merupakan salah satu komputer PC sangat popular pada masa itu. Operating Sistem yang digunakan adalah: CP/M 8 Bit. Komputer ini sangat populer pada awal tahun 80-an.
IBM mulai mengeluarkan Personal Computer pada sekitar tahun 1981, dengan menggunakan Operating System MS-DOS 16 Bit. Dikarenakan harga yang ditawarkan tidak jauh berbeda dengan komputer lainnya, disamping teknologinya jauh lebih baik serta nama besar dari IBM sendiri, maka dalam waktu yang sangat singkat komputer ini menjadi sangat popular. 5. Generasi Kelima (Sekarang – Masa depan)
5 Generasi Komputer Dalam Sejarah
Pada generasi ini ditandai dengan munculnya: LSI (Large Scale Integration) yang merupakan pemadatan ribuan microprocessor kedalam sebuah microprocesor. Selain itu, juga ditandai dengan munculnya microprocessor dan semi conductor. Perusahaan-perusahaan yang membuat micro-processor diantaranya adalah: Intel Corporation, Motorola, Zilog dan lainnya lagi. Dipasaran bisa kita lihat adanya microprocessor dari Intel dengan model 4004, 8088, 80286, 80386, 80486, dan Pentium.
Pentium-4 merupakan produksi terbaru dari Intel Corporation yang diharapkan dapat menutupi segala kelemahan yang ada pada produk sebelumnya, disamping itu, kemampuan dan kecepatan yang dimiliki Pentium-4 juga bertambah menjadi 2 Ghz. Gambar-gambar yang ditampilkan menjadi lebih halus dan lebih tajam, disamping itu kecepatan memproses, mengirim ataupun menerima gambar juga menjadi semakin cepat.
Pentium-4 diproduksi dengan menggunakan teknologi 0.18 mikron. Dengan bentuk yang semakin kecil mengakibatkan daya, arus dan tegangan panas yang dikeluarkan juga semakin kecil. Dengan processor yang lebih cepat dingin, dapat dihasilkan kecepatan MHz yang lebih tinggi. Kecepatan yang dimiliki adalah 20 kali lebih cepat dari generasi Pentium – 3.
Packard Bell iXtreme 4140i merupakan salah satu PC komputer yang telah menggunakan Pentium-4 sebagai processor dengan kecepatan 1.4 GHz, memory RDRAM 128 MB, Harddisk sebesar 40 GB (1.5 GB digunakan untuk recovery), serta video card GeForce2 MX dengan memory 32 MB. HP Pavilion 9850 juga merupakan PC yang menggunakan Pentium-4 untuk processor nya dengan kecepatan 1.4 GHz. PC Pentium-4 Hewllett-Packard ini dating dengan dominan warna hitam dan abu-abu. Dibanding dengan PC lainnya, Pavilion merupakan PC Pentium-4 dengan fasilitas terlengkap. Memory yang dimiliki sebesar RDRAM 128 MB, Harddisk 30 GB dengan monitor sebesar 17 inchi.

skateboarding

A skateboard is typically a specially designed plywood board combined with a poly urathane coating used for making smoother grinds and stronger durability, used primarily for the activity of skateboarding.
It appears the first skateboards to reach public notice came out of the surfing craze of the early 1960's, probably just wooden boards with roller-skate wheels attached. The surfing group Jan and Dean even had a minor hit called "Sidewalk Surfing" in 1964. The modern skateboard originated in California in the 1970s with the advent of Polyurethane wheels. In time, it became a pastime for surfers when the waves were lax. By the mid 1980s they were mass produced and sold throughout the United States.
A skateboard is propelled by pushing with one foot while the other remains on the board, or by pumping one's legs in structures such as a pool or half pipe. A skateboard can also be used by simply standing on the deck while on a downward slope and allowing gravity to propel the board and rider. If you ride with your right foot forward, you ride "goofy"; if you ride with your left foot forward, you ride regular.
Recently, electric skateboards have also appeared. These no longer require the propelling of the skateboard by means of the feet; rather a electric engine propells the board, fed by an electric battery.
There is no governing body that declares any regulations on what constitutes a skateboard or the parts from which it is assembled. Historically, the skateboard has conformed both to contemporary trends and to the ever evolving array of stunts performed by riders/users, who require a certain functionality from the board. Of course, the board shape depends largely upon its desired function. Longboards are a type of skateboard with a longer wheelbase and larger, softer wheels.

Parts

Descriptions of the following skateboard parts are the ones most prevalent in popular, modern forms of skateboarding. Many niche disciplines exist with exotic or alternative constructions and designs that fall outside of much of the descriptions listed. The usual parts to design a complete skateboard are the deck, trucks, wheels, bearings, hardware, and griptape.

Deck

The underside of a skateboard. In this photo the deck, trucks and wheels can be seen.
Most decks are constructed with a six to seven-ply cross-laminated layup of Canadian maple. Some of them have special materials that help to keep the deck from breaking: such as fiberglass, bamboo, resin, Kevlar, carbon fiber, aluminum, and plastic. Some decks made from maple ply are dyed to create various different coloured ply. Modern decks vary in size, but most are 7 to 10.5 inches wide. Wider decks can be used for greater stability when transition or ramp skating. Skateboard decks are usually between 28 and 33 inches long. The underside of the deck can be printed with a design by the manufacturer, blank, or decorated by any other means. On early year 2010 a European Company Gravitis introduced the proprietary asymmetric shape, with decentered twin tips to enhance the rider's stance.[citation needed]
The longboard, a common variant of the skateboard, has a longer deck. This is mostly ridden down hills or by the beach to represent the riding of a wave in the ocean on a surfboard. This was created by two surfers; Ben Whatson and Jonny Drapper. One of the first deck companies was called "Drapped" taken from Jonny's second name. "Old school" boards (those made in the 1970s–80s or modern boards that mimic their shape) are generally wider and often have only one kicktail. Variants of the 1970s often have little or no concavity, whereas 1980s models have deeper concavities and steeper kicktails.
Grip tape, when applied to the top surface of a skateboard, gives a skater's feet grip on the deck. It is most often black but can come in a variety of colors including clear, allowing the top of the deck to be decorated. It has an adhesive back and a sandpaper-like top.

[edit] Trucks

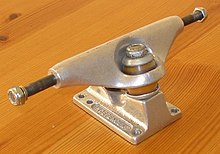
An Independent brand skateboard truck
Attached to the deck are two metal (usually aluminum alloy) trucks, which connect to the wheels and deck. The trucks are further composed of two parts. The top part of the truck is screwed to the deck and is called the baseplate, and beneath it is the hanger. The axle runs through the hanger. Between the baseplate and the hanger are bushings, also rubbers or grommets, that provide the cushion mechanism for turning the skateboard. The bushings cushion the truck when it turns. The stiffer the bushings, the more resistant the skateboard is to turning. The softer the bushings, the easier it is to turn. A bolt called a kingpin holds these parts together and fits inside the bushings. Thus by tightening or loosening the kingpin nut, the trucks can be adjusted loosely for better turning and tighter for more stability.
Skateboard trucks are manufactured in a number of different axle widths. In general an axle width should be chosen that is close to the width of the deck it will be used with[1]. For example, a 7.75" wide deck will usually be fitted with trucks that have axles between 7.5" wide and 8.0" wide. Trucks that are too wide can make doing tricks difficult and can cause the wheels to get in the way when the skateboard is being ridden. Trucks that are too small can be hard to maintain stability and can cause wheel bite to occur when turning.
Longboard specific trucks are a more recent development. A longboard truck has the king pin laid at a more acute angle (usually between 38 and 50 degrees[2]) to the deck, this gives a lesser degree of turning for the same tilt of the deck. This allows riders to go much faster while still maintaining stability and control.

Wheels

The wheels of a skateboard, usually made of polyurethane, come in many different sizes and shapes to suit different types of skating. Larger sizes like 54–85 mm roll faster, and also move more easily over cracks in pavement. Smaller sizes like 48–54 mm keep the board closer to the ground, require less force to accelerate and produce a lower center of gravity, but also make for a slower top speed. Wheels also are available in a variety of hardnesses usually measured on the Shore durometer "A" scale. Wheels range from the very soft (about Shore A 75) to the very hard (about Shore A 101). As the A scale stops at 100, any wheels labeled 101A or higher are harder, but do not use the appropriate durometer scale. Some wheel manufacturers now use the "B" or "D" scales, which have a larger and more accurate range of hardness. Modern street skaters prefer smaller wheels (usually 51–54 mm), as small wheels with lighter trucks can make tricks like kickflips and other flip tricks easier by keeping the center of gravity of the skateboard closer to the deck, thus making the deck easier to spin. Street wheels are often quite hard as this allows the wheels to slide easier on waxed surfaces for bluntslides and nose/tailslides. Vertical ramp or "vert" skating requires larger wheels (usually 55–65 mm), as it involves higher speeds. Vert wheels are also usually softer, allowing them to maintain high speed on ramps without sliding. Slalom skating requires even larger wheels (60–75 mm) to sustain the highest speeds possible. They also need to be soft and have better grip to make the tight and frequent turns in slalom racing. Even larger wheels are used in longboarding and downhill skateboarding. Sizes range from 65 mm to 100 mm. These extreme sizes of wheels almost always have cores of hard plastic that can be made thinner and lighter than a solid polyurethane wheel. They are often used by skateboard videographers as well, as the large soft wheels allow for smooth and easy movement over any terrain.
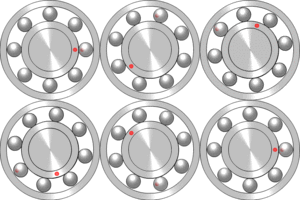
An Animation of the working principle for a ball bearing. N.B. The diagram shows an 8-balled-bearing whereas a skateboard bearing only has 7

Grip tape

Grip tape is a sheet paper or fabric with adhesive on one side and a surface similar to fine sand paper on the other. Grip tape is applied to the top surface of a board to allow the rider's feet to grip the surface and help the skater stay on the board while doing tricks. Grip tape is usually black, however it is also available in other colors such as red, blue, navy blue, neon green, hi-liter pink, or transparent. While grip is optional, most Skaters prefer to have on their board.

Bearings

Each skateboard wheel is mounted on its axle via two bearings. With few exceptions, the bearings are the industrial standard "608" size, with a bore of 8 mm, an outer diameter of 22 mm, and a width of 7 mm. These are usually made of steel, though silicon nitride, a high-tech ceramic, is sometimes used. Many skateboard bearings are graded according to the ABEC scale. The scale starts with ABEC1 as the lowest, 3, 5, 7, 9. It is a common misconception that the higher ABECs are better for skateboarding, as the ABEC rating only measures tolerances, which do not necessarily apply to skateboards. The ABEC rating does not determine how fast or how durable a bearing used for skateboarding will be.[3] In particular, the ABEC rating says nothing about how well a bearing handles axial (side-to-side) loads, which are severe in most skateboard applications. Many companies do not show the ABEC rating, such as Bones Bearings, which makes bearings specifically for skateboarding, often marketed as "Skate Rated". Each bearing usually contains 7 steel or ceramic ball bearings, although other configurations are used as well.

Hardware

Mounting hardware is a set of eight 10-32 UNC bolts, usually an Allen or Phillips head, and matching nylon locknuts. They are used to attach the trucks to the board. Some have a different colored bolt to show which side is the nose of the skateboard.

Optional components

Risers/wedges

Risers increase the space between the truck and the deck. This allows the truck to turn further without causing wheel bite (when the wheel touches the deck and stops rotating). Wedges can be used to change the turning characteristics of a truck.[4]

Rails/ribs

Narrow strips of plastic or metal that are attached under the deck lengthwise along the edges. They are used for additional grip for grabs, and to enhance sliding while protecting the deck's graphics at the same time. Slip tape
Slip tape is a clear piece of self adhesive plastic that sticks to the underside of a deck. It helps protect the board's graphics and allows the board to slide easier. Another name for this is everslick.

Lapper

A lapper is a plastic cover that is fastened to the rear truck and serves to protect the kingpin when grinding. It also prevents hang-ups by providing a smoother transition for the truck when it hits an obstacle or a metal pipe or round bar.

Nose guard

A plastic bumper used to protect the front of a skateboard. Used in old school boards.

Tail guard

Is a plastic cover that protects the tail end of the skateboard

 Tail Devil

A small tail guard like accessory that has embedded flints that spark when the tail or nose of the skateboard comes in contact with the ground while doing a trick.

Copers

Plastic half tubing that protected the axles of the trucks. In the 1980-85 period, stolen shopping cart handles were cut by some to fit as a makeshift coper.[citation needed]

Kamis, 07 Oktober 2010

Download Antivirus AVG 9 Free Edition

Share7
avg logoBagi anda pengguna antivirus AVG, kini AVG versi 9.0 yang baru-baru ini dirilis sudah bisa anda download secara gratis maupun berbayar. Khusus bagi anda yang doyan gratisan , AVG Free Edition 9.0 ini sepertinya layak untuk dicoba yang kehandalannya tidak jauh beda dengan AVG 9 yang berbayar (premium). Pada AVG 9.0 ini juga kompatibel untuk 3 system operasi windows terbaru yakni Windows XP, Windows Vista and Windows 7. Untuk mendapatkan AVG Anti Virus 9.0 versi gratisan, anda bisa mendownloadnya melalui link berikut ini :

Adapun fitur-fitur baru yang ditambahkan pada AVG 9 Free ini antara lain :
  • Anti-Virus & Anti-Spyware. Perlindungan terhadap virus, spyware, adware dan trojan.
  • LinkScanner Search-Shield. Memindai semua hasil penelusuran Google, Yahoo dan MSN/Live search.
  • LinkScanner Active Surf-Shield. Melindungi dari halaman web yang bervirus saat Anda menjelajah web.
Selamat mendownload... ^_^

Selasa, 05 Oktober 2010

Membuat Photoshop Berjalan Lebih Gesit di PC Berspesifikasi Rendah

Bagi Anda yang berkecimpung dalam bidang desain grafis pastinya mengenal aplikasi Photoshop. Karena begitu handalnya aplikasi tersebut membutuhkan komputer berspesifikasi lumayan untuk dapat berjalan dengan lancar. Jika Anda merasa membuka aplikasi Photoshop membutuhkan waktu yang lama dan sangat lambat ketika memproses gambar dengan resolusi tinggi, berarti salah satu komponen di dalam komputer Anda perlu di-upgrade. Namun bagaimana jika saat ini kebutuhan tersebut terbentur oleh masalah dana? Selagi Anda menabung untuk membeli perangkat keras baru yang spesifikasinya lebih tinggi, bagaimana kalau mengikuti beberapa tips yang akan dijelaskan di bawah ini.

Versi Photoshop yang dipakai dalam tutorial kali ini adalah CS4 dan screenshot-nya juga dari versi tersebut, tapi bagi Anda pengguna versi yang lama tetap bisa mengikuti tips ini, karena pilihan opsi pengaturannya tetap sama, mungkin hanya teks dan posisi/ lokasinya saja yang berbeda.

Untuk melakukan pengaturan kita masuk ke bagian Preferences melalui menu bar Edit -> Preferences atau shortcut Ctrl + K.


Tip 1: Ubah Pengaturan Untuk Meningkatkan Performa

Pilih Performance:


Seperti yang terlihat terdapat empat bagian di sini: Memory Usage, Scratch Disks, History dan Cache & GPU Settings. Kita akan mencoba untuk merubah pengaturan di bagian ini.


Penggunaan Memori

Photoshop mengkonsumsi banyak memori RAM untuk mendukung kinerjanya. Penggunaan RAM ini bisa kita atur di dalam Photoshop. Anda bisa merubah ukuran batas maksimal Photoshop dapat menggunakan jumlah kapasitas RAM yang tersedia. Untuk yang menggunakan RAM dengan jumlah kapasitas sampai dengan 2GB, coba ubah dengan menggunakan slider antara 55-65% dan untuk pengguna RAM 4GB bisa diatur sebesar 70-75%.


Catatan: Jangan menggeser slider sampai maksimal, karena akan menyebabkan sistem menjadi crash, tentukan ukurannya dengan mempertimbangkan pemakaian RAM oleh aplikasi lain dan juga sistem operasi.


RAM Virtual/ Memori Virtual

Selain menggunakan memori pada RAM, Photoshop juga menggunakan RAM virtual/ memori virtual (Scratch Disks). Memori virtual adalah sebagian dari kapasitas harddisk yang dialokasikan untuk menyimpan data yang diproses oleh aplikasi. Jika Anda memiliki lebih dari satu harddisk, coba atur supaya Photoshop juga dapat menggunakan memori virtual di harddisk lainnya, sehingga dapat meningkatkan kinerjanya secara drastis.


Catatan: Coba alokasikan sebanyak jumlah ruang harddisk yang kosong, jangan khawatir dengan kapasitas yang tersedia, karena memori ini sifatnya temporal/ sementara, jadi data-data yang disimpan akan dihapus setelah Anda menutup Photoshop.


History & Cache

Salah satu keunggulan mengolah gambar menggunakan komputer dengan aplikasi digital adalah saat terjadi kesalahan kita bisa dengan mudah dan cepat kembali kondisi sebelumnya. Pastinya kita banyak melakukan kesalahan saat bekerja dan bayangkan jika tidak ada fungsi "Undo." Di Photoshop kita bisa mengatur berapa jumlah keadaan (History) yang disimpan, tapi semakin banyak dialokasikan, maka makin besar memori yang nantinya terpakai.

Besaran jumlah history yang disimpan sudah diatur sebelumnya sebesar 20. Untuk komputer berspesifikasi rendah jumlah ini terlalu banyak dan dapat menurunkan kecepatan kinerja Photoshop, terutama saat Anda bekerja dengan gambar berukuran besar. Coba atur jumlah yang disimpan menjadi 10-15 saja, maka Photoshop akan berjalan lebih lancar.

Pengaturan di bawahnya, yaitu Cache Levels digunakan untuk meningkatkan kecepatan render gambar. Pilih level cache yang lebih tinggi untuk gambar beresolusi tinggi dengan jumlah layer sedikit, atau level cache rendah untuk gambar beresolusi rendah dengan banyak layer. Pilihannya antara level 1-8.


Catatan: Pengaturan ini akan aktif setelah Anda menutup dan membuka kembali Photoshop.


Tip 2: Bersihkan/ Hapus Clipboard

Jika Anda melakukan fungsi copy & paste pada gambar, maka akan disimpan sebagai clipboard dan akan terus tersimpan. Clipboard pada Photoshop juga mengkonsumsi RAM, besarannya seukuran gambar yang disalin, semakin besar ukurannya maka semakin besar pemakaian memori. Jika Anda ingin membebaskan clipboard dari memori caranya dengan menuju ke bagian Edit -> Purge.


Catatan: Perhatikan dengan baik saat Anda ingin melakukan hal ini, jangan sampai masih ada data dan history yang dibutuhkan pada clipboard, karena jika sudah di-purge maka tidak dapat dikembalikan lagi.


Tip 3: Lakukan Defrag Pada Harddisk

Harddisk yang isinya terfragmentasi ikut menjadi penghambat jalannya aplikasi, apalagi Photoshop itu adalah aplikasi yang memiliki ukuran file besar dan komponen yang banyak. Maka lakukan proses deframentasi dengan menggunakan aplikasi pihak ketiga untuk hasil yang lebih baik & cepat dibandingkan dengan bawaan sistem operasi. Dan juga disarankan dilakukan secara berkala, maka pilihlah defragmenter yang bisa diatur untuk berjalan secara otomatis sesuai dengan jadwal yang Anda tentukan.

Untuk lebih memahami mengenai proses deframentasi, manfaatnya, bagaimana cara melakukannya dengan baik, dan aplikasi defragmenter terbaik yang bisa Anda pakai. Maka saya sarankan untuk membaca artikel yang sangat bagus yang ditulis oleh saudara Pepoluan aka The Handsome, dimana dijelaskan secara ringkas dan padat juga disertai dengan tautan menuju situs pengujian terhadap berbagai aplikasi defragmenter yang ada di pasaran.

[WinPowerTip] Defragmentasi Hard Disk Anda!


Tip 4: Tutup Aplikasi yang Tidak Dibutuhkan

Tips yang terakhir ini agak aneh, tapi biasanya kita sering lupa dan langsung komplen kenapa Photoshop-nya lambat, apalagi jika aplikasi tersebut berjalan di belakang layar. Agar kegiatan menggunakan Photoshop berjalan lancar coba perhatikan aplikasi apa saja yang saat itu sedang berjalan, coba intip di bagian Tray Notification dan cek juga di Task Manager (Ctrl + Shift + Esc). Tutup yang tidak diperlukan agar sumber daya komputer bisa digunakan semaksimal mungkin oleh aplikasi Photoshop.